This comprehensive guide will walk you through each process stage, from initial solar assessment to regular monitoring and maintenance. We’ll cover critical aspects such as system design, financial incentives, permits, approvals, and installation. This guide will prepare you for your solar energy journey, positively impacting your wallet and the environment.
Step 1: Solar Assessment
Solar assessment is the first step in the home solar panel installation process. This crucial step involves a site survey, energy consumption analysis, and shading analysis. A solar energy professional conducts a site survey to evaluate the suitability of your home’s roof, considering its size, orientation, and structural integrity. Energy consumption analysis involves reviewing your past utility bills to determine your average energy usage, which helps design a solar system that meets your needs. The shading analysis is an essential part of the assessment. It identifies potential obstructions like trees or neighboring buildings that may cast shadows on your solar panels, reducing their efficiency. By conducting a comprehensive solar assessment, you can ensure your solar panel installation is optimally designed for your specific requirements and location.
Step 2: System Design
The second step in the home solar panel installation process is system design. A solar energy professional will create a customized solar system plan for your home, considering factors such as roof size, orientation, and local weather patterns. The design aims to maximize energy production and ensure long-term efficiency.
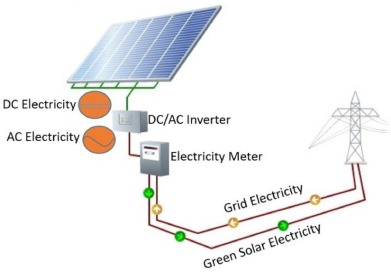
Three main components are carefully selected: solar array, inverter, and mounting hardware. The solar array comprises multiple solar panels, which are chosen based on your energy needs and available roof space. The inverter converts the direct current (DC) the solar panels deliver into alternating current (AC), suitable for household use. Lastly, the mounting hardware secures the solar panels to your roof, ensuring stability and proper angle for optimal sunlight exposure.
This tailored design is crucial for achieving the best performance from your solar panel system.
Credit: sciencedirect.com
Step 3: Financial Incentives
The third step in the solar panel installation process is to explore and apply for financial incentives available in your region. These incentives can substantially reduce the upfront cost of your solar system. They come in various forms, such as tax credits, rebates, and grants. Tax credits, like the federal investment tax credit (ITC) in the U.S., allow you to deduct a percentage of your solar installation cost from your income taxes. Some states, municipalities, or utility companies offer rebates, directly discounting the overall price. Grants can offset installation costs, often available for specific groups or projects. Researching and applying for these incentives is essential to maximize savings on your solar investment, making solar energy more cost-effective for homeowners.
Step 4: Permits and Approvals
In the fourth step of home solar panel installation, you must obtain permits and approvals from local authorities and your utility company. Building permits ensure that your solar installation meets local building codes and regulations. Electrical permits verify the system complies with electrical safety standards.
Additionally, you’ll need to secure a utility interconnection agreement. This outlines the terms for connecting your solar system to the grid, allowing you to return excess energy and receive credits on your utility bill. The process may vary depending on your location and utility provider. To make this step easier, gather the necessary documentation and consult with your solar energy professional, who can help guide you through the permitting and approval process.
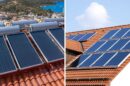
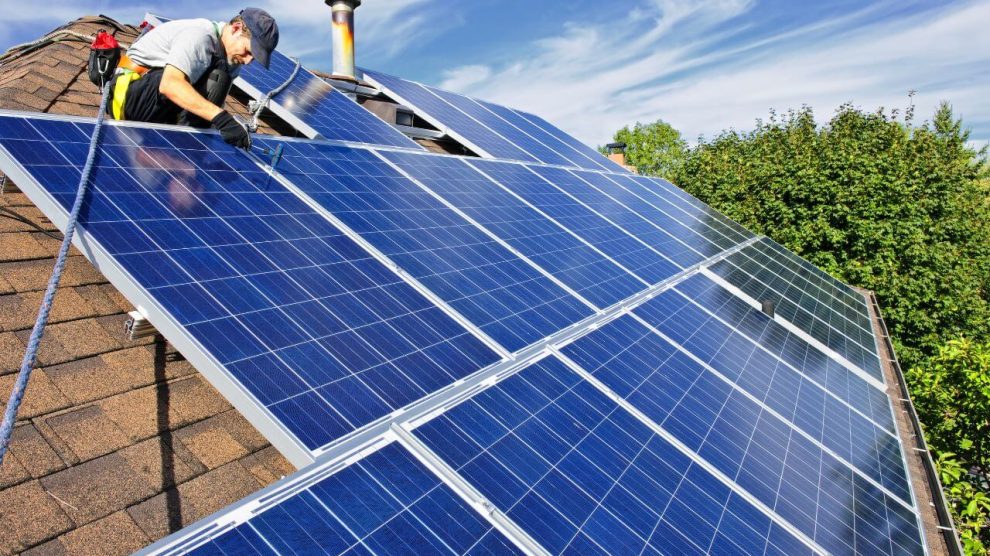
Step 5: Solar Panel Installation
Trained professionals will install the solar panels onto your roof or designated area in the fifth step of the installation process. The optimal positioning and angle of the panels will be ensured using a customized system design to maximize sunlight exposure. After the panels are firmly mounted, the technicians will connect them with wiring, forming a solar array. This array will then be linked to the inverter, which will convert the panels’ direct current (DC) to alternating current (AC) for household use. To install the inverter, a safe, easily accessible location like a utility room or garage will be chosen. During this step, professionals will adhere to safety standards and best practices, guaranteeing your home’s high-quality and efficient solar energy system.

Credit: mdpi.com
Step 6: System Testing
The sixth step, system testing, is crucial to ensure your solar panel system operates efficiently and safely. The solar energy professional will commission the system, initialize it, and set up all components according to the design specifications. Performance testing is then conducted to verify that the solar panels generate the expected amount of electricity and that the inverter is correctly converting the energy for use in your home. Safety checks include inspecting wiring connections, grounding systems, and other electrical components to minimize potential hazards. This step confirms your solar panel system’s proper functioning and safety before connecting it to the utility grid.
Step 7: Utility Grid Connection
The seventh stage in the solar panel system setup is integrating with the local electrical network, a critical phase known as the utility grid connection. This step is pivotal for grid-connected solar structures, allowing you to draw power from the grid when necessary and feed excess solar-generated energy back into the grid. Through net metering, you can accrue credits on your utility invoice for the extra energy your system produces.
This integration is facilitated by setting up a bi-directional meter at your residence. This apparatus monitors the electrical flow in both directions – incoming from the grid to your household and outgoing from your home to the grid. It aids in keeping tabs on the energy used and the surplus generated, guaranteeing precise billing and reimbursement. Establishing a connection with the utility grid paves the way for smooth, effective, and economical solar energy utilization.
Step 8: Monitoring and Maintenance
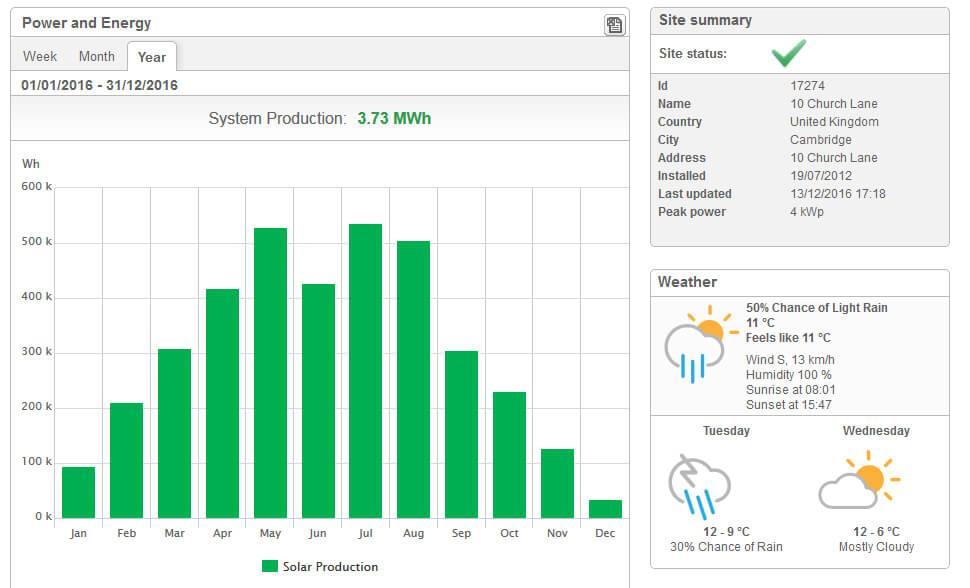
Step 8, monitoring and maintenance, is crucial for the long-term performance of your solar panel system. System monitoring, often enabled through internet-connected devices, lets you track energy production and consumption in real-time. This helps you identify any performance issues or inconsistencies promptly.
Preventive maintenance involves proactive measures, such as cleaning solar panels and inspecting mounting hardware, to ensure optimal system efficiency. Periodic inspections conducted by solar energy professionals assess the overall health of your system, including components like the inverter and wiring. In the long run, it saves time and money to identify potential issues ahead of time.
Keeping an eye on your system’s performance and addressing maintenance needs will maximize its lifespan and efficiency.
Credit: exeoenergy.co.uk
FAQ
What are the rules for installing solar panels?
Generally, you need to follow local building codes and obtain the necessary permits. Ensuring your installation adheres to zoning regulations, setback requirements, and any homeowner association guidelines is crucial. Additionally, you must comply with electrical codes and safety standards, including proper grounding and wiring. Lastly, consult with your utility company to understand interconnection rules and requirements for net metering. You should always work with an experienced and licensed solar installer.
What are the different types of solar panels?
- Monocrystalline panels exhibit a singular, uncontaminated silicon crystal structure, presenting a lustrous, ultramodern countenance and achieving outstanding efficacy. They are fitting for abodes with restricted rooftop capacity as they generate a greater quantity of energy per square footage.
- Made up of various silicon crystals, polycrystalline panels exhibit a bluish color and are marginally less effective. However, they come at a lower cost than monocrystalline panels but require more area to produce equivalent power.
- Thin-film panels are constructed from amorphous silicon, cadmium telluride, or copper indium gallium selenide. Despite their lower efficiency and larger size, they are more adaptable and budget-friendly for specific applications.
For a typical house, how many solar panels do you need?
Several factors, including energy usage, solar panel efficiency, and sunlight availability determine the number of solar panels required to sustain a standard household. Generally, a house in the United States consumes 877 kWh monthly. If you use a 300-watt solar panel, which receives around 4 hours of sunlight daily, about 24 panels would be required to fulfill all your energy necessities. Acknowledging that your demands may differ, subject to your area, usage patterns, and solar system configuration, is crucial. For a personalized evaluation, consult a solar energy expert.