Have you spotted the solar panel trend popping up around your neighborhood and local shops? It’s like suddenly, everyone’s in on this super cool secret for whipping up clean energy for their homes and businesses. And if you’re sitting there mulling over whether to dive into the solar scene, scratching your head about how the whole installation shindig goes down, I’ve got your back. Let’s walk through this thing together, step by easy step.
Site Assessment
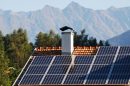
Alright, picture this: imagine having a buddy who’s super into solar tech pop by your place. They’re there to give your home the once-over, kind of like how you’d eye up the perfect spot for a new couch. They’ll check out your roof, squint at any shady spots, and even whip out a tape measure. It’s a bit like a tailor measuring you for a suit, but this time it’s for your house to wear a shiny new solar panel system.
They’ll climb up there, get a feel for the roof’s angle, its direction, and how sturdy it is—because, let’s face it, we want to make sure your roof can rock those solar panels without breaking a sweat. It’s also about figuring out how many panels can fit up there and how much power they’ll generate, kind of like planning the ultimate rooftop party but for panels basking in the sun.
And speaking of the sun, they’ll be like weather forecasters, predicting how much sunlight your roof gets throughout the year. Ideal scenario? Your roof gets to sunbathe without any shade crashing the party, soaking up all that solar goodness.
They’re not just looking at how your roof lounges in the sun. They’re thinking about where on the roof to throw these panels so they catch the most rays and start powering your pad like champions.
Once they’ve done the detective work, they’ll sit down with you, kind of like sharing a coffee, and walk you through what they found. You’ll get the lowdown on how the solar setup could look, where the panels would go, and how much zap they’ll generate. It’s all about getting you and the installer on the same page, so you can make a cool, informed choice about jumping onto the solar bandwagon.
Since we got those solar panels up and running, our electric bill has taken a massive dive—it’s dropped by nearly 70%! Can you believe it? And besides saving a bunch of cash, there’s this awesome feeling of doing our bit for the planet by cutting down on our carbon footprint. It’s like hitting two birds with one stone, right? Feeling pretty good about this win-win situation! (Lisa Jackson)
Permitting and Paperwork
In some places, you might need to pull together a stack of detailed plans for your solar setup or even get a special okay to pop those panels on your roof.
Usually, you’ll send all this paperwork to the folks at your local planning and zoning office and your utility company. They need to give your solar dream the thumbs up and check everything out before you can start generating your own sunshine juice. Here’s the kicker: sometimes, this part of the journey can take as long as putting the panels up themselves. It’s super important to get a head start on understanding what your neighborhood expects well before your panels are ready to go up.
What’s the best move? Get cozy with your solar installer and lay out the game plan together. You’ll want to know every step, from the first screw to the final inspection. Smooth sailing comes from keeping everyone in the loop—your installer, the utility folks, and the local permit gurus.
If there’s a hiccup and something doesn’t meet the grade, fixing it could be on your dime. That’s why it’s key to be BFFs with your installer and ask heaps of questions. If something doesn’t sit right with you, pause and get it cleared up. Nailing this part means less headache later and getting your solar show on the road faster.
Credit: energysage.com
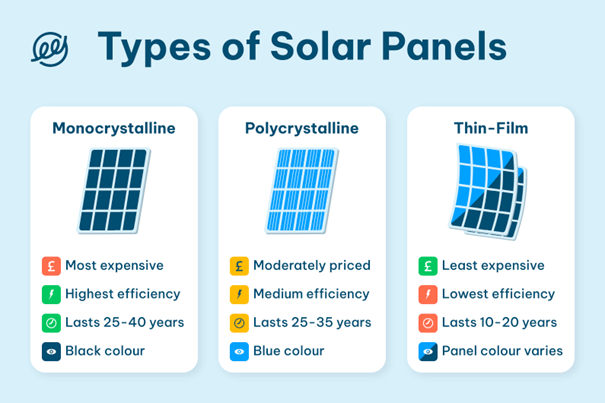
Choosing the Right Solar Panels
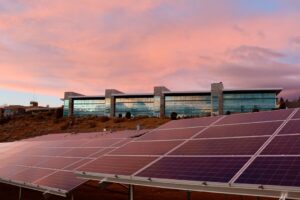
Since solar panel installation costs and life expectancy are often viewed as significant home improvement and investment projects, you should be very careful in this matter. Thus, we do not consider cost to be the most important factor during solar shopping.
According to Sam Lozanova, an eco-, and Earth-friendly living expert, most experts’ opinions will line up around the same thing: efficiency, power capacity, and the panels’ life expectancy. He said, “greater efficiency and higher power capacity as well as longer life expectancy are always desirable.” This is because the more efficient your solar panels are, the less space you need to produce the same amount of electricity. Besides, higher efficiency also means you will harvest more electricity under the same amount of sunlight. Since many, but only some days, there will be a sunny day in a year, a high-efficiency solar panel is important to fully harvest the electricity we need.
For power capacity, it is measured by the unit called direct current (DC) electricity over the time of an hour. For example, if a 30-watt solar panel is going to charge our phone for 2 hours, it means the panel will produce 60 watts of electricity to feed our phone. So, suppose your home uses a lot of electricity, and you are trying to add a solar power system. In that case, these giant 300W (300-watt) solar panels are a relatively better choice than the smaller 100W (100-watt) panels, provided you have enough roof space.
Some general recommendations for your home are: choose solar panels with at least 16% efficiency—17% efficiency is the most common because it is the most financially efficient; choose solar panels with a power capacity high enough to provide enough electricity to fulfill your needs.
Credit: theecoexperts.co.uk
You know, I was kinda on the edge about how those tough, chilly winters would mess with our solar panels. I mean, with all the snow and frost, you’d think they’d hardly work, right? But wow, was I surprised! Despite the cold blanket covering them, our setup’s still cranking out heaps of clean energy. Picture this: our electricity bills have shrunk by a whopping 60%—it’s pretty incredible! And, there’s this awesome feeling of doing something good, not just for our bank account, but for the planet too. It’s like, every time I flip on a light, I know we’re making a difference with renewable energy. (Daniel Ramirez)
Roof Preparation
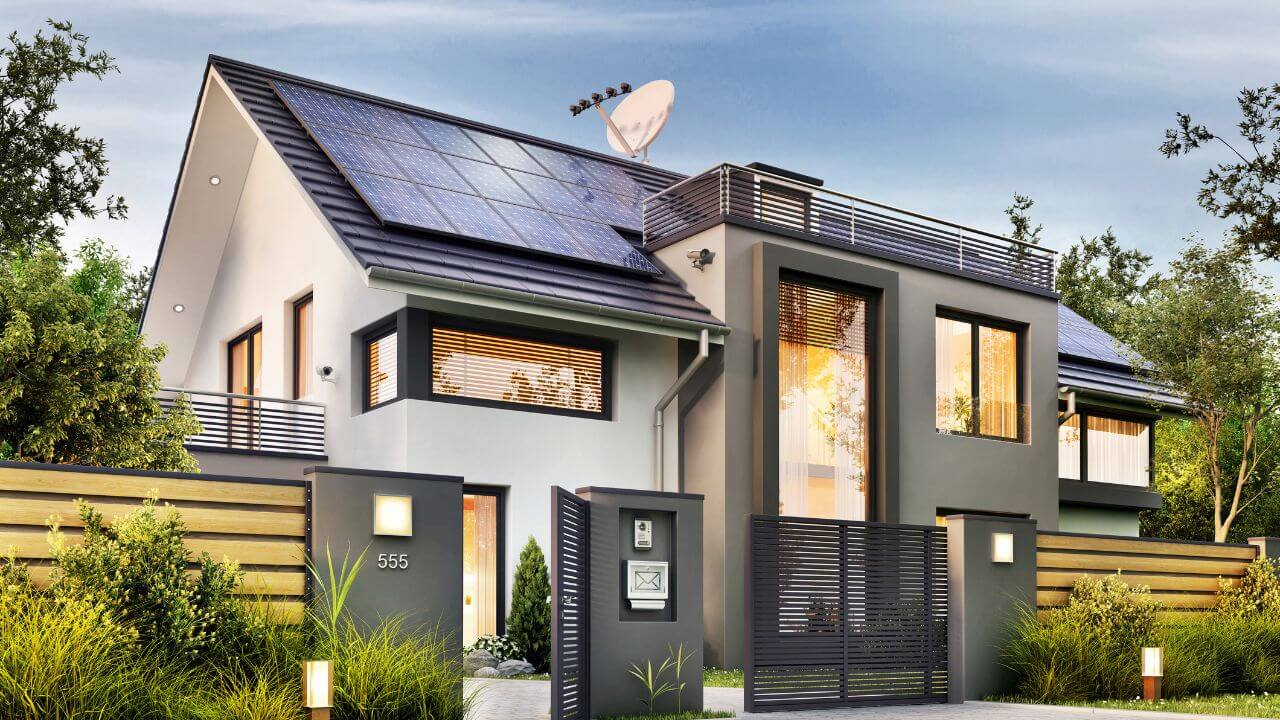
First off, imagine we’re giving your roof a little makeover to welcome its new friends, the solar panels. Before we can start jazzing things up, we need to clear the stage – that means taking off some of the roofing where the panels will go. It’s kind of like preparing a nice, comfy bed for them to lie on.
Once those panels are up they’re also acting like a superhero shield for your roof, keeping those shingles underneath safe and sound. But, and it’s a big but, these panels are in it for the long haul, way longer than your average shingles. So, if down the road you need a roof touch-up, you’ll have to lift those panels off for a bit.
And about setting them up, there’s this cool racking system that acts like the skeleton, holding everything in place. But to get it just right, we might need to do a little bit of roof surgery, like tweaking the rafters to create the perfect spot to anchor down your panels. It’s all about making sure the weight of the panels is supported just right, from the racks down to the roof, making sure everything’s as sturdy as can be.
Now, we’ve got to talk about keeping things watertight. Imagine making all these adjustments and then having leaks—no thank you! So, sealing up any holes is a top priority to keep your roof happy and dry.
And here’s a little insider tip: before those panels grace your roof, we give the metal bits a swipe of special paint. It’s like sunscreen for your racking system, keeping it from weathering away.
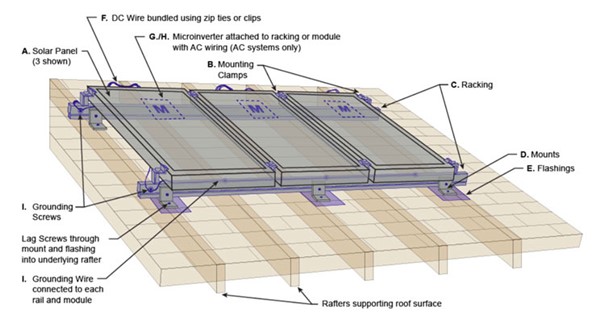
Mounting the Solar Panels
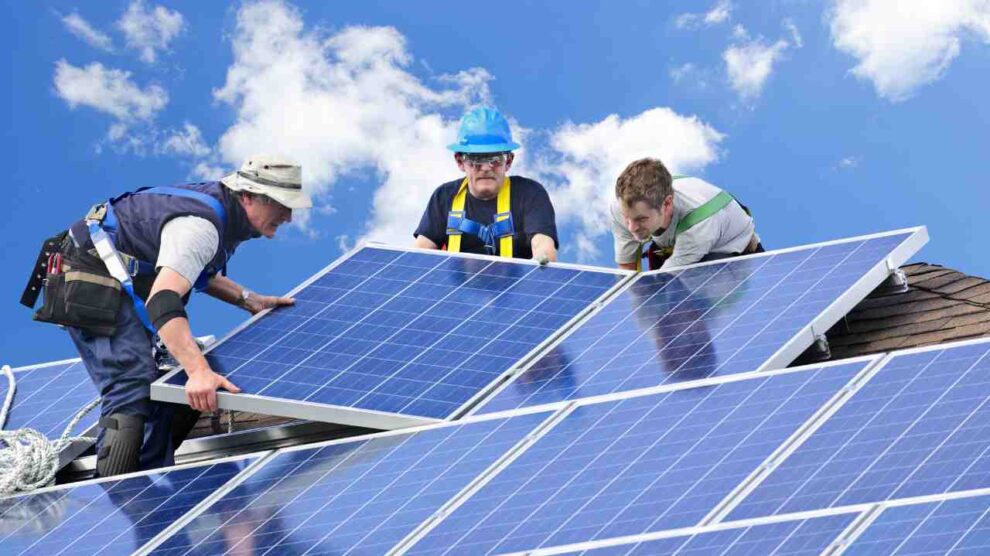
First, once your roof is ready to go, we’re going to lay out our solar setup. Imagine a bunch of solar panels chilling together on your roof, all snug on their little rail system—that’s what we call an array. It’s like a cozy bed for your panels, mounted right on your rooftop.
We kick things off by placing the end clamps. They latch onto the rails at the very edges of your roof, holding the panel rows in place. Then, we secure those rails, making sure there’s just the right amount of space between each solar panel row for them to bask in the sun without shadowing each other. We anchor these rails right into the rafters under your roof—kind of like setting up the foundation for a deck.
With the clamps and rails all set, it’s time to gently lay the solar panels onto their new home and clip them onto the rails. It’s like putting the final pieces into a puzzle. These panels get linked up with special connectors and cables, making sure they’re snug with mid-clamps that sit between the panels, not at the ends.
Next, we’re going to tidy up by installing a conduit. It’s essentially a safe passage for all those cables running from your panels down to the inverter. This little device is pretty crucial—it transforms the solar power into the kind of electricity that powers your coffee maker and lights. We usually fix the inverter on an outside wall, near your fuse board and a power source.
After the inverter is up, we connect it to your home’s main fuse board. And voilà, you’re almost ready to flip the switch on your very own mini power station. But, hold on – we need to make sure everything’s up to snuff. A certified electrician will give it the once-over, filling out a form that’s like a gold star for your solar panels and confirming everything’s installed perfectly. This form gets sent off to the powers that be, and you’ll get a copy, too. It’s super important, especially if you’re looking into Feed-in Tariffs to get a little kickback from your energy contribution.
Credit: solarpowerworldonline.com
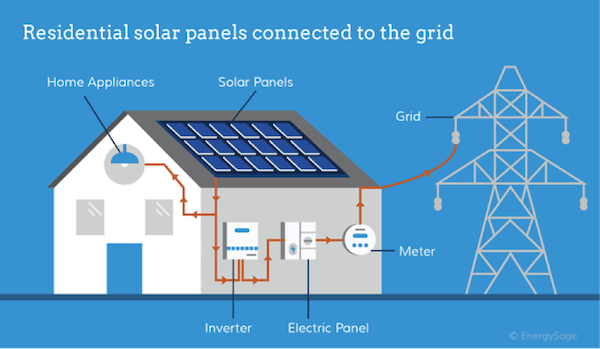
Electrical Wiring and Connection
The journey starts with linking up those panels, either in a line (that’s series) or side by side (parallel style). These panels churn out what’s known as DC (direct current), which, simply put, needs a bit of transformation to play nice with our home appliances. Enter the solar inverter – this clever gadget flips DC into AC (alternating current), which is what powers pretty much everything in your home.
Now, when we talk about connecting these panels to the grid, there’s not a ton of complicated stuff involved, mainly because the inverter’s got a neat trick. Based on some pretty specific guidelines (hello, BS 7671 and Engineering Recommendation G83), it knows when to take a little nap to make sure everything’s running smoothly and safely. This switch-off magic acts as a guardian, ensuring the setup remains within safe operation zones.
Rolling up the sleeves for the electrical bits, it’s all about precision and professionalism. Actually, slapping solar panels on your roof is considered electrical work and is kept in check by Building Regulations Part P. This means a seasoned electrician should handle the connections, keeping in tune with BS 7671 standards. They’ve got the skills for everything from mounting the panels to wiring and final checks.
Lastly, it’s all about dotting the i’s and crossing the t’s with standards and regulations, including some specific ones like MCS 001 and MCS 017, not to mention MIS 3002 for extra measures and tests. Once everything’s checked off, an MCS certificate is the cherry on top, marking the completion of your solar panel installation by a registered company.
The solar inverter works as the unsung hero of your solar power setup. It’s like a magic box that takes the sunlight captured by your solar panels, which is in a kind of energy called DC, and turns it into AC, the energy that powers your fridge, lights, and pretty much everything else in your house. This step is super important because it ensures the energy is suitable for your home or business use.
Credit: newsouthernenergy.com
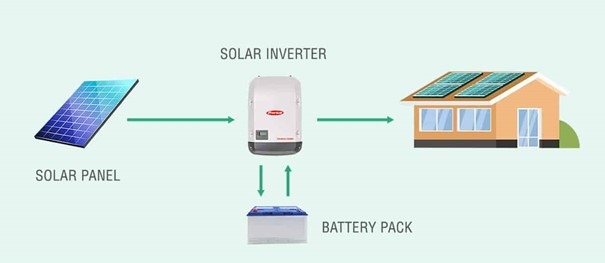
Inverter Installation
The solar inverter works as the unsung hero of your solar power setup. It’s like a magic box that takes the sunlight captured by your solar panels, which is in a kind of energy called DC, and turns it into AC, the energy that powers your fridge, lights, and pretty much everything else in your house. This step is super important because it ensures the energy is suitable for your home or business use.
Imagine your inverter as a high-performance athlete; it needs a cool, breezy spot to work its best. Tucking it away in a cramped, hot spot is a no-go because it could get overheated and not do its job as well, shortening its life in the process.
There’s also this cool accessory you can get – a power monitor. This little buddy sits next to your inverter and keeps tabs on how much power your panels are pumping out. It’s perfect for keeping an eye on how your system is doing and handy for spotting any hiccups early.
We just took the leap and popped some solar panels on our roof. You know, trying to do our bit and not lean so much on the grid. Picking the right inverter was a bit of a mission – we really wanted something that wouldn’t wake us up at night but still did the job well. We ended up going with SolarEdge because a bunch of folks recommended it, and let me tell you, we haven’t looked back. It’s whisper-quiet, which is perfect since it’s snuggled up close to our bedroom. And it’s a champ at turning sunlight into savings on our electricity bills. We’re super stoked with our dive into solar energy, and a huge shoutout to this awesome inverter for making it such a smooth ride. (James Chen, Homeowner)
Inspection and Approval
Let’s talk about what goes into making sure your solar panel system is up to snuff, kind of like giving it a health check-up before it starts its job of powering your place with sunshine. First off, we kick things off with what’s called an insulation test. It’s a bit like making sure all the wires are playing nice together – no sneaky touching or anything off with the panels themselves.
Then, there’s this cool thing called I-V curve tracing. Imagine it as taking your solar panels for a test drive, checking how they perform under different shades of sunlight. This test draws a picture (well, a curve, really) showing how the current and voltage play together. If something’s off, this curve goes wonky, and we know a panel might need a bit of TLC or even a swap-out.
There’s also a bit where the team tinkers with the inverter and the switchgear to make sure they’re in perfect harmony, like conducting an orchestra to get that perfect pitch and rhythm of voltage and frequency. The full inverter check-up, though, happens a bit later, after a special meter gets hooked up by some tech wizards from the DNO (that’s the Distribution Network Operator).
We also play a bit of pretend – simulating a blackout to ensure the system can shut down quicker than you can say “oops”, in half a second, to be exact. It’s all hands on deck for this, with our ground team pairing up with a super savvy commissioning engineer who’s like the guardian angel of the system, making sure everything is spot-on.
After all this testing, we bring in a keen-eyed accreditor for one last look-see. If they give us the thumbs up, it means we’re good to go—the system is safe, solid, and ready to soak up that sun. And that, my friend, is how we make sure your solar setup is ready to light up your life safely and efficiently.
References:
- Mustafa, R. J., Gomaa, M. R., Al-Dhaifallah, M., & Rezk, H. (2020). Environmental impacts on the performance of solar photovoltaic systems. Sustainability. (https://www.mdpi.com/2071-1050/12/2/608/pdf)
- Patel, N., Gupta, N., & Babu, B. C. (2021). Design, development, and implementation of grid-connected solar photovoltaic power conversion system. Energy Sources, Part A: Recovery, Utilization, and Environmental Effects, 43(22), 2915-2934. (https://www.researchgate.net/profile/Nirav-Patel-28/publication/342150298_Design_development_and_implementation_of_grid-connected_solar_photovoltaic_power_conversion_system/links/601e344ba6fdcc37a80641dc/Design-development-and-implementation-of-grid-connected-solar-photovoltaic-power-conversion-system.pdf)
- Sangpongsanont, Y., Chenvidhya, D., Chuangchote, S., & Kirtikara, K. (2020). Corrosion growth of solar cells in modules after 15 years of operation. Solar Energy, 205, 409-431. (https://www.sciencedirect.com/science/article/pii/S0038092X20304977)